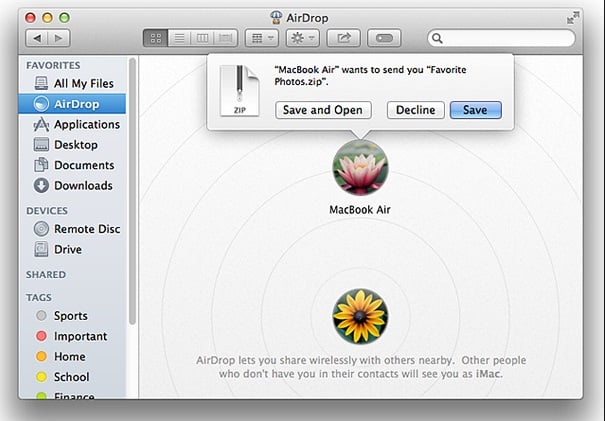
AirDrop is the file sharing feature on Mac that was introduced with OS X Lion to allow the file transferring between Macs. This feature was then made available on the iOS devices with the release of iOS 7 for enjoying the same feature in iOS devices as well. But, the introduction of OS X Yosemite made it possible to share files between MAC and iOS easily in no time.
However, there are some requirements in order to making this file sharing process successful between MAC and iOS using Airdrop. These are:
- iOS 7 or later version
- OS X Yosemite
- Airdrop compatible MAC
- iPhone 5 or later
- iPad 4 or later
- Fifth generation of iPod touch
Also, if your MAC have a firewall enabled in it, make sure that the ‘Block all incoming connections’ is not activated. This can be checked by going to Menu Bar > Apple> System Preferences> General> Security & Privacy> Firewall> and then check the Firewall Options.
Also ensure that the devices are within 30 feet distance for sharing files with each other using Airdrop on Mac.
If you are facing some common Mac issues, click here to know the fixes.
Learn here How to show hidden files and folders on MAC
The process of sharing files between MAC and iPhone using airdrop is discussed below
Mac to iOS:
The step by step process to transfer files from MAC to iOS devices is explained here.
- First, turn on the Wi-Fi in your iPhone by going to settings> Wi-Fi. Next, turn on Wi-Fi in Mac by navigating to Menu> Wi-Fi. However, it is not necessary to stay connected through the same Wi-Fi network. A direct wireless connection is automatically set up for Airdrop.
- Once you have turned on Wi-Fi on both the devices, the next step is to turn the Bluetooth in both the devices. In iPhone it can be done by going to settings> Bluetooth and for MAC you need to follow the path: Menu Bar> Apple> System Preferences> Bluetooth to turn Bluetooth On.
- Next comes the airdrop. First make this option on in iPhone by going to Control Center> AirDrop and choose the option ‘contacts only’ or ‘Everyone’ according to your requirements. To turn on Airdrop on Mac, navigate to ‘Finder’ and then follow the path: Menu Bar> Go> AirDrop and Click on the option “Allow me to be discovered by” to choose ‘Contacts only’ or ‘Everyone’ from the options available.
- Both the devices are now ready to share files with each other. Go to the Finder to get the airdrop menu on your Mac. The iOS devices will be displayed there in a circle. What you need to do is just drag any file from MAC and drop it to circle.
- Your iOS device will be prompting then to accept the file. Just accept it and files will be transferred to the iOS device.

Image source – www.macrumors.com
Also you can share files between MAC and iOS devices using other apps that have built in share feature. This feature can be accessed by clicking on the upper right corner of the app and it will be represented by a square with upper facing arrow.
So, you are now aware of the file transferring process between MAC and iPhone. If your question is how to use airdrop between MAC and iPhone 6, the process is same as above as the method do not vary according to the versions rather the process is same for all versions of iPhone. So, the process of how to use airdrop from MAC to iPhone 5 is also same as mentioned.
iOS to MAC:
- The file transferring process from iPhone to MAC is similar as above. Here also you need to first turn on the Airdrop on both the devices.
- Next, search for the file in the iPhone that you want to transfer to MAC and then tap on the share icon.
- In the next screen, the MAC icon will be displayed. A press on that icon will start the file transferring process.
- An alert will be prompted on Mac asking you to accept. Accept it and the file will be transferred to the MAC. That’s all. The files will be available in the download folder in your Mac.

Image source – support.apple.com
So, you have now learned both the process of file sharing between MAC and iPhone and can perform the task successfully. In case, you face any difficulties, restart both the device once and try performing again.

